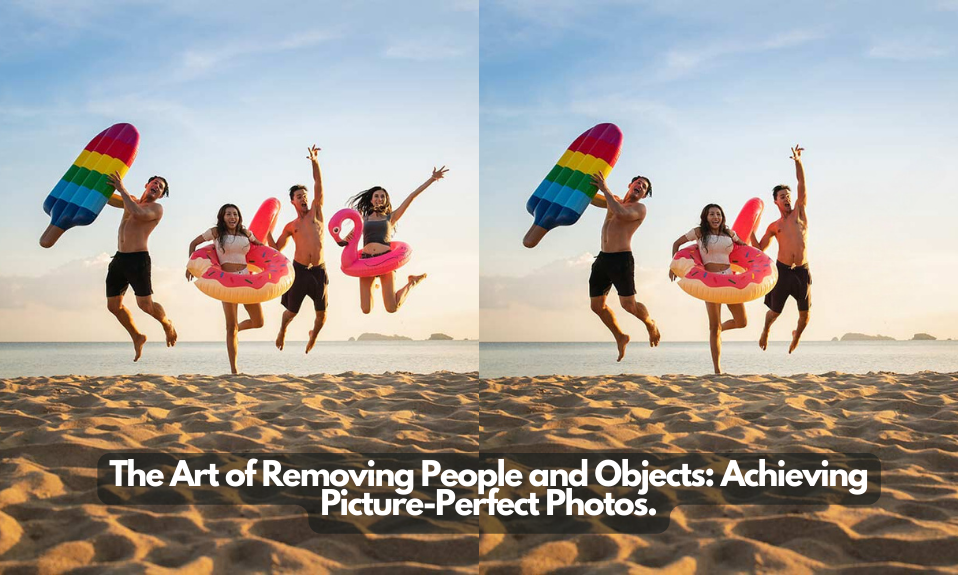
The Art of Removing People and Objects: Achieving Picture-Perfect Photos
Have you ever taken a great photo but later realized there were things or people in the picture that you didn’t want? It can be annoying. Well, don’t worry. Today’s guide shows you how to remove unwanted people and objects from your photos. So, you can get that perfect shot you’re aiming for.
Photography is a great way to capture special moments and make memories. But sometimes, things we want to avoid ending up in our pictures spoil the whole look. Thanks to technological advancement, we now have fantastic photo editing tools that can disappear those distractions.
This article teaches you different ways to remove people and objects from your photos, from simple methods to advanced techniques. We’ll also talk about the importance of planning your shots carefully to avoid unwanted elements from the beginning.
When Will You Need to Remove People from Photos?
There are numerous scenarios where you might find it necessary to remove people from photos. Here are a few everyday situations:
ü Distractions and Photobombs
People can accidentally walk into your shot or intentionally ruin your picture by photobombing. Removing them helps restore the original focus of the image.
ü Privacy Concerns
If you take photos in public places, some people may want to avoid being in your pictures. You can remove them from the image to respect their privacy.
ü Commercial Use
If you plan to use a photo for commercial purposes, you usually need permission from any recognizable people in the image. If you don’t have those permissions, removing those individuals from the photo is safer and more accessible.
ü Historical or Cultural Sites
When you visit popular historical or cultural sites, taking a clean shot is often challenging without any tourists or visitors around. Removing these individuals can help emphasize the beauty of the site itself.
ü Creating a Mood
You might want to convey a sense of solitude or emptiness in a photo, which can often be achieved by removing people from the shot.
ü Real Estate and Product Photography
In professional fields like real estate or product photography, it’s common to remove people from the photos so that the focus remains on the property or product being showcased.
The Art of Avoidance: Capturing Uncluttered Photos
Regarding photography, the art of avoidance can be a powerful tool in capturing uncluttered and visually striking photos. When you intentionally omit distracting elements, it creates images that convey a clear and focused message. This also helps to draw the viewer’s attention to the intended subject. Here are a few ways how you can get uncluttered and perfect images.
1. Picking the Right Moment
The initial act of capturing the photo is important. With a discerning eye, you can minimize the intervention of unwanted elements by simply selecting the right moment to click the shutter. Understanding the light, studying the scene, and timing your shots can create a clean, distraction-free composition.
2. Changing Perspective
When a clear shot seems impossible, try changing your perspective. Experiment with different angles—shoot from high above or low down, move around, and explore the scene. A subtle shift can hide unwanted objects behind your primary subject or landscape features.
3. Utilizing Depth of Field
A photographer’s trick to make unwanted subjects less noticeable is to utilize a shallow depth of field. This technique blurs out anything not in focus, allowing your main subject to stand out. The right lens and settings can significantly assist in this endeavor.
How to Remove Objects from Photos with Software
Removing objects from your photos is a common task that can be accomplished using various software, including Adobe Photoshop, Adobe Lightroom, GIMP, and Affinity Photo. Due to its popularity and powerful features, let’s learn how to remove objects with Adobe Photoshop. However, most photo-editing tools follow similar steps.
Step 1: Select the Spot Healing Brush Tool from the Toolbar
The equivalent of a “Remove Tool” in Adobe Photoshop would be the Spot Healing Brush Tool. Select this tool from the toolbar (located on the left side of the screen by default). The Spot Healing Brush icon looks like a band-aid.
Step 2: Adjust the Spot Healing Brush’s Size
In the options bar at the top of the screen, you can adjust the size of the Spot Healing Brush to match the size of the object you want to remove.
Step 3: Paint over the Person or Object You Want to Remove
Position your cursor over the area you want to remove, then click and drag to ‘paint’ over the object or person. Be careful to stay within the lines of the object as much as possible. Photoshop will replace the area you paint with pixels from the surrounding area.
Step 4: Release Your Mouse Button
Once you’ve painted over the entire object or person, release your mouse button. Photoshop will process the area and blend it with the surrounding pixels.
Step 5: Paint Over Problems with the Spot Healing Brush
Sometimes, the Spot Healing Brush may not perfectly remove the object. There may be repeating patterns, color mismatches, or leftover bits of the object. You can fix these issues using the Spot Healing Brush again on these problem areas.
Wrap Up
Removing unwanted people and objects from your photos may feel overwhelming at first. With a good grasp of photo composition, some shooting tricks, and mastering your editing software, you can turn your images into stunning works of art.
Remember to be patient and practice regularly—every photo you take and edit is a chance to improve your photography skills. So keep going if it turns out perfectly right away. And most importantly, have fun with it. Photography is a creative outlet, so experiment, try new things, and let your artistic vision guide you.


