How to Record Internal Audio on Mac [Better Pick Within]
Recording internal audio on a Mac can be a bit tricky, as most recording software, including the built-in QuickTime Player, doesn’t offer direct options for capturing internal sound. So how to record internal audio on Mac? Usually, you’ll need to install additional plugins or use your Mac’s microphone to record external sounds, which can be cumbersome. Fortunately, we’re here to introduce a more straightforward alternative to recording your Mac’s internal audio.
How to Record Internal Audio on Mac with QuickTime Player
QuickTime Player is a powerful multimedia software that comes pre-installed on Mac computers. It is an excellent choice for various multimedia tasks, including video playback, simple editing, and screen recording. One of its notable advantages is its seamless compatibility with the macOS ecosystem, providing a user-friendly experience without the need for extra downloads or complex setups.
However, QuickTime Player does have limitations when it comes to recording internal audio on Mac. By default, it can only capture external sounds through the microphone, making it unsuitable for recording audio generated by Mac applications or system processes. To overcome this limitation, you need to install a plugin called Soundflower.
Now, let’s go through the steps to enable internal audio recording with QuickTime Player using the Soundflower plugin.
Step 1. Download and Install Soundflower on Mac
Visit the Soundflower GitHub page and download the latest release.
Step 2. Choose Soundflower as the Audio Output
Once Soundflower is successfully installed, change your audio output device by going to “System Preferences” > “Sound” > “Output,” and select “Soundflower 2ch” (Soundflower 2ch is suitable for recording internal audio, while Soundflower 64ch is for more advanced use).
Step 3. Create a New Aggregate Device
Then you have to create an Aggregate Device that combines Soundflower (for internal audio recording) and your microphone (for external audio recording).
Open the “Audio MIDI Setup” app on your MacBook, create a “Multi-Output Device” by clicking the “+” icon, check both “Built-in Output” and “Soundflower (2ch),” and make it the default by right-clicking “Multi-Output Device” and selecting “Use This Device For Sound Output.” This allows you to capture and hear internal audio simultaneously.
Step 4. Record Internal Audio on Mac
Now, you can record both internal and external audio simultaneously. Open QuickTime Player, select “New Audio Recording,” and click the drop-down menu next to the red button. Under the microphone device options, choose “Aggregate Device.” This allows you to capture both internal and external audio. This method is also applicable when you want to screen record on Mac with audio.
If you prefer to record only internal audio, you can select “Soundflower (2ch)” as the microphone device, but please note that it may not work on some Mac models.
Better Way: Record Internal Audio on Mac Without Soundflower
As mentioned earlier, capturing internal audio using QuickTime requires third-party plug-ins such as Soundflower, which adds complexity and is not the most user-friendly option. To simplify this process, we recommend an all-in-one solution – FonePaw Audio Recorder.
FonePaw Audio Recorder is a versatile audio recording tool designed to make audio capture on Mac and Windows simple and efficient. This user-friendly software eliminates the need for complex plug-ins like Soundflower and provides a seamless solution for recording internal and external audio. In addition, this program also has screen-recording features, letting you record your Mac’s screen with high-quality audio.
Key Features of FonePaw Audio Recorder
- Easily record both internal and external audio on your Mac with a single click
- Ensures high-quality and noise-free recorded audio
- Save recordings in various formats (MP3, M4A, WMA, CAF, FLAC, OGG, and OPUS)
- Set recording duration for automatic termination
- Allows for easy editing and trimming of recordings after capturing
- Support screen recording on Mac with audio
Follow the simple steps and guidance blow on how to record internal audio on Mac using FonePaw Audio Recorder.
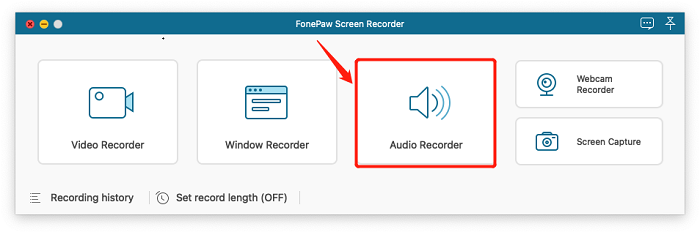
Step 1. Launch FonePaw Audio Recorder
Download and install FonePaw Audio Recorder on your iMac. Launch it and select “Audio Recorder” to get started.
Step 2. Enable System Sound or Microphone as You Need
Activate the system sound and microphone as needed. It’s advisable to adjust the volume beforehand by accessing the sound settings via Apple menu > System Preferences > Sound. Consider recording a short sample to verify the volume before proceeding further.
The first time you enable the system sound option, a notification will prompt you to install an audio plug-in to record internal audio on your Mac. Simply follow the provided instructions to proceed.
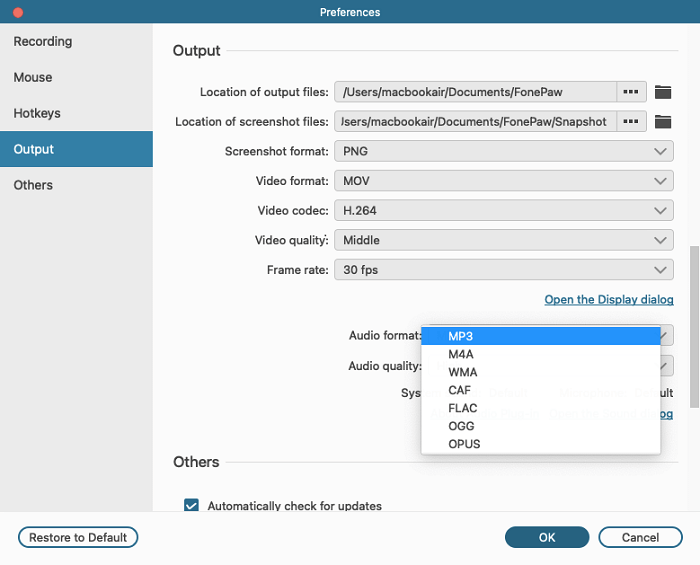
Step 3. Customize the Audio Output Settings
You have the flexibility to adjust the audio output settings, including audio format and quality, to suit your needs. To do so, you can click the gear icon or select FonePaw Audio Recorder > Preferences in the upper left corner of the interface.
Step 4. Start Audio Recording on Mac
After configuring all your settings, simply click “REC” to start the audio recording process on your Mac. Once done, click the red square button in the top left corner and review the recorded sound.
Conclusion
In conclusion, when it comes to how to record internal audio on Mac, we have explored two methods: QuickTime Player, which needs an extra plug-in for internal audio, and FonePaw Audio Recorder, a one-click solution for easy Mac audio recording. For a simple and comprehensive audio recording solution on your Mac, FonePaw Audio Recorder is the top choice!